Sunday, 13 January 2013

How to paint a Chaos Warhound Titan part 9. Basing, Weathering and Completion.

This has been one long haul of a job, but this is the final post detailing the construction of my Chaos Warhound Titan. That's right, the titan is complete!


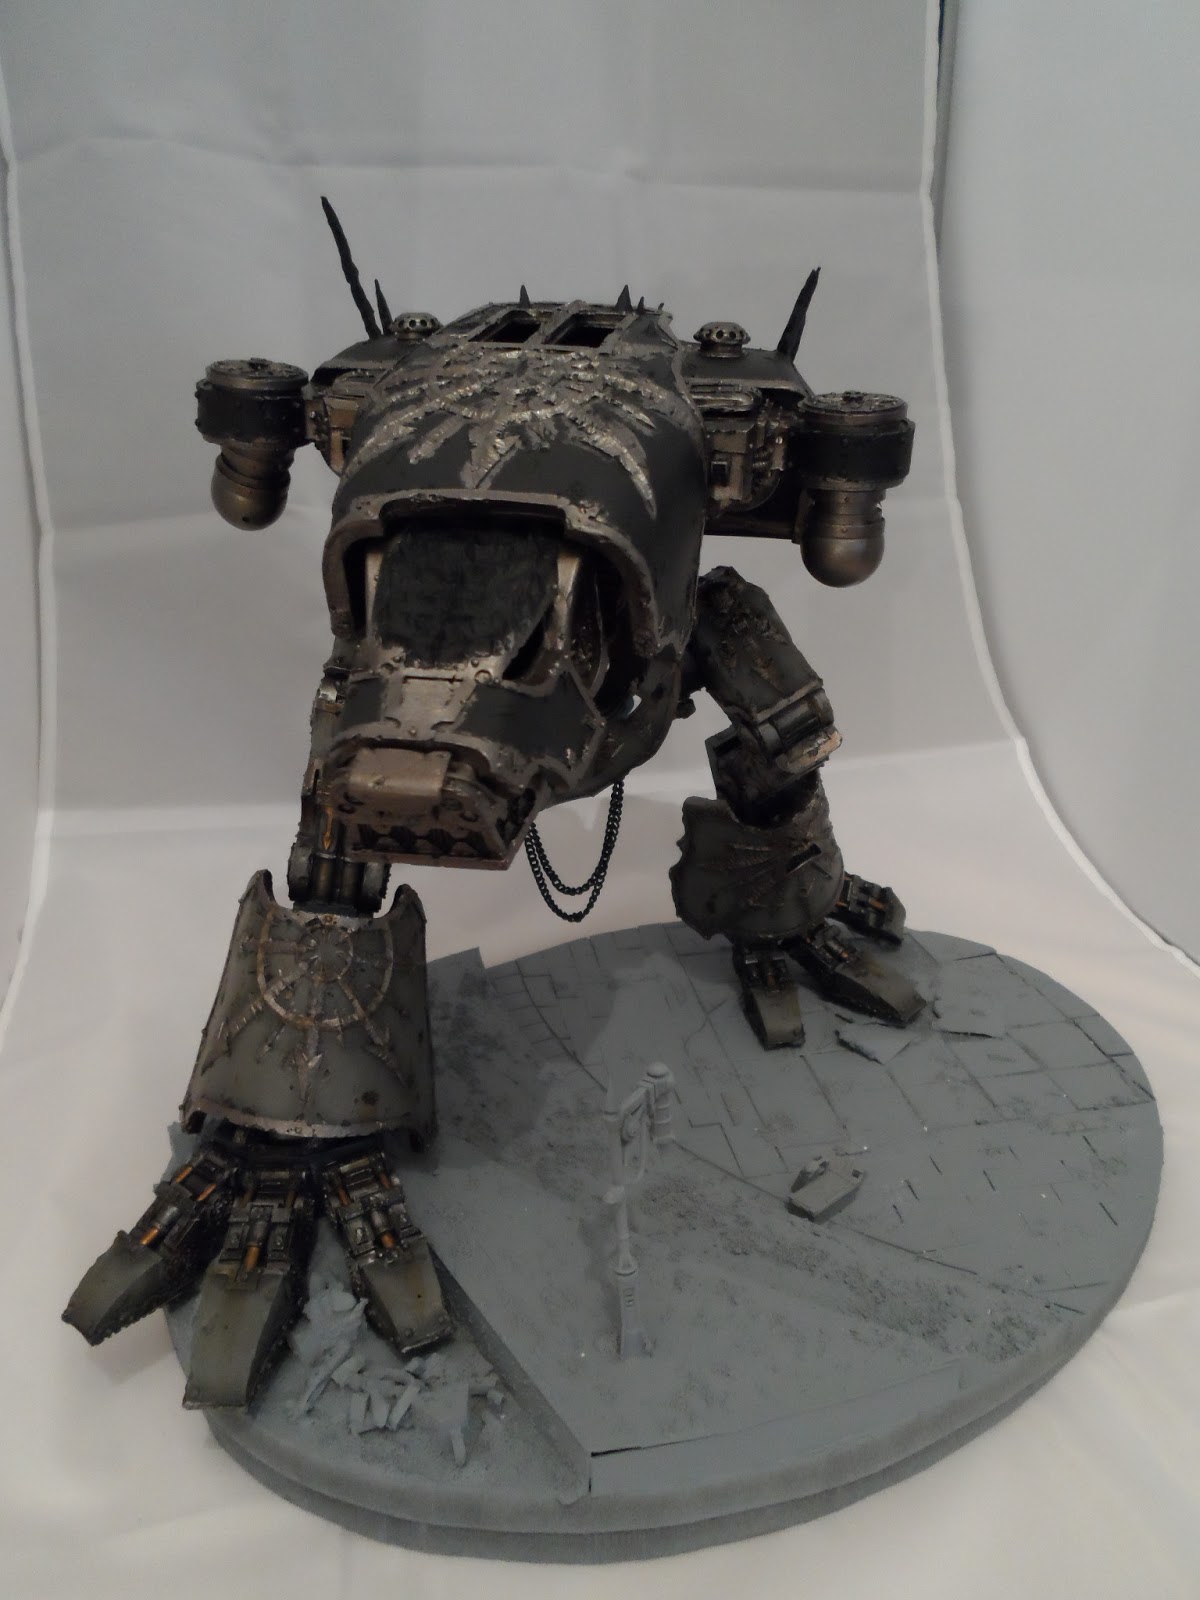
So last time, I'd left the titan drying overnight as I'd glued the various painted modules together with epoxy resin. All that remained was to paint the base up. Firstly, a coat of tamiya's TS-4 German grey out of a spray can, using a piece of paper to mask off the chequer board tiles. Easy.


Just checking at every stage to see how the over all effect will come out.


Next up, I sponged a mix of 25/50 White to Codex grey over the german grey areas, to add depth, then the same again with 50/50 white-Codex grey. After this, I used the top highlight mix to paint in the white tiles. Adding more white with each pass, I layered up the dusty white effect. Then I added a spot of codex grey to black, and did a few sponging layers over the black tiles. 


a few sponge layers of Umber paint here and there to break up the grey, then I painted the details in, such as fuel cans, grids, street lights, etc.  After this little lot, it was time to start weathering the big bastard up.


5 layers of forgeworld's weathering powder, starting with Dry mud, to Aged rust, to Light rust, to Black soot, finally Dark Iron, applied simpley with a brush, to various part of both the titan and it's base.


I tried to think of where these effects would lay naturally on a machine like this. The mud, obviously was concentrated around its feet, though not exclusively. Rust I stuck to areas such as bolts, rivets, and damaged areas.  Soot went around the nozzle on the Inferno cannon and the exhausts. dark iron I used on damaged areas and over the soot on the Inferno cannon to bring out the nozzle from the dark soot.


Bear in mind these shots are pre-sealing, so the colours are a lot more vivid and predominant than they'll end up. This is most obvious on the light rust seen here on the void shield generators on the titans back carapace. 


One quick coat of Army painter's Anti shine Matt varnish to hold it all together, and boom. On big horrible Chaos Titan, crushing Imperial territory! All that remains is to finish off the details on its base, and you can see the varnish has lifted a little bit of the weathering powder on the Inferno gun which needs sorting.


A couple more shots for the fun of it. 


Quick scaling shot with some traitor armour.

 Only one thing left to mention in this post. I spent the last day of the titan project modelling with my good friend Tom, in what we called 'Robot vs Dinosaur day'. Would've been rude not to show the great big Squiggoth he's been working on!  


Still work in progress as you can see, but he's not far off done. I think you'll agree he's done a gnarly job.

Our first apocalypse game of 2013 is booked in on the 16th February, so keep an eye out for reports of these two super heavies blasting each other apart!  

Friday, 11 January 2013

How to paint a Chaos Warhound Titan part 8. Interior and final contruction.


The end is nigh! I'm so close to the end of this titan project I can taste it. I've given it some hammer over the last few weeks and hopefully now its coming to a head. Last time The exterior of pretty much each part of the titan was close to ready to fitting together for final weathering.


Here are the different 'modules' as I put it, ready to go together. That is, minus the base. But before we get ahead of ourselves, I have the crew from the interior to paint. 


Now quite often with titan blogs, people always seem to focus all of their painting efforts on the crew and the interior. I'm not sure why this is, as in reality, they probably get seen about as much as the titan's arm pits.
Ok, maybe a little bit more, especially the head, but for the amount the interior get seen, I'd rather spend the time weathering up the paint work. People will actually see that when it's on the table.  


So, these shots are the kind that you find all over the internet when you google 'Warhound Titan', nothing to special to be honest. The corrupted gooey stuff has had some highlights swallowed somewhat on these pictures, trust me, it looks a bit better in the resin. 


A quick shot of a work in progress weapons servitor. You can see his brain! You get really see on this shot how choosing where you apply washes really helps how your metals look on a model like this. 


One detail that is hard to pick up on from the forgeworld stock photographs, is exactly what this thing here is. When I first got the kit, I though it was what remains of the right hand weapons servitor, just a torso, but once I'd applied a wash, it brought out those veins you can see. What you're looking at is the beating corrupted heart of the deamon inside! Weird!  


Keeping the weirdness going, the kits features a crazy chaotic lash tendril thing, which actually bursts out of the dead moderatii strung up on the back of the machine, through the middle bulkhead, through the inside of a techpriest pinned against the access panel to the cockpit, through there, into the titan's head, and connects to the back of the princepts head. Forgeworld sculptors are pretty messed up chaps, so it seems. 


After the interior was to a standard(not finished yet, I've got weathering powder to go), I realized I'm pretty much done painting the actual machine. I still have the base to go, but this means I was able to glue the rest of the titan together. This picture show it in dry dock, propped up and the epoxy resin drying. It is also the first shots of the actual finished pose. Obviously, I'm not going to glue the carapace and the top of the head on. Ileft it like this overnight to make sure to was dried before removing the props. and clipping my brass rod pins to length.

All I have to do then now, is get the base painted up, and weather the monster up.

Til next time.

Gonders 

Wednesday, 9 January 2013

How To Paint a Chaos Warhound Titan, Part 7, Painting Guns.

Next up on this monster are some truly huge guns. So we've first got a workbench shot of the Plasma blast gun. I wasn't sure what colour to do the plasma coils at first. I knew even at this scale, plasma looks good with a brighter glowing colour, but I didn't want anything that's contrast to much with the overall dark colour scheme.


I'd Previously don't my imperial titan's plasma a rich green colour, and I thought if I could try the same green, but make it a little more washed out than the imperial version, I might be on to something. I did my best to wet blend it, and in this shot, it's still wet, though it dried smoother than this picture shows.

Next up was the Inferno cannon. Pretty standard stuff here to be honest, that same granite and metal as the rest of the titan. Perhaps the only thing worth noting at this stage is the sponged on scorched effect around the nozzle. Just a pure umber acrylic paint at this stage. Later on, this with get a blast of black weathering powder. 


 Next up, I did a quick test to see how the guns look in place. They aren't glued yet, it was just a test to check my teal-washed out green didn't clash to badly with the rest of the machine.


I'm quite happy with the overall look so far. There is plenty to do more though. In this shot you can see I've started to use washes to begin weathering and pick out some of the detail across the armour. 


 To shots to finish off of the titan. the exterior is pretty much painted, though still awaiting weathering. The interior, however, is where I'll be painting next.


After which, the base will start to get some brush work too. 

Thanks for looking, til next time. 

Gonders 


Monday, 7 January 2013

How To Paint a Chaos Warhound Titan, Part 6, Torso.


And we're back with another update. A couple of days back I left you with a set of basic painted legs. My aim is to get the whole titan to pretty much that level of paint, before I start detailing..


I did want to get this here eye painted in, to try and match the one from the top of my reaver. I don't think I got quite the same iris shade, but I think bearing in mind it's hidden under a titan's chin, it shouldn't be a huge problem.


So, with that, it was time to start layering up the paint work on the torso. Once again, I followed exactly the same methods as can be found on the legs in my last post for the metal work and the granite plating. I painted the spines with a simple mix of black and codex grey, feathering out the highlights toward the top.


At this point, I begun to paint some of the interior details for the simple reason to keep things interesting. I've been sponging granite and boltgun metal like crazy for a couple of days, and just needed a change. This is a very work in progress shot, however.


Then, back to the grind of metal and granite painting for the carapace and the head. Just a shot to show how the machine is starting to look. Speaking of carapace and head...


I took the granite highlights much brighter on these two, so it sits in line with the Reaver, once again. I think the brighter carapace was a bold choice, but I'm happy with it. I just didn't want the overall look to be that of a big block of granite. As you can see from this shot, the chaos marking on top got somewhat sponged upon, so back to the work bench... 


To cut back in with my metals. I also took the chance to pick out some other scrapes in the same metals, such of the two over the nose, and the missing decayed sections round the back.
 

So here we have the titan as it stands. I can certainly feel to coming together. Next stop, the big guns!

Til then, 

Gonders


Saturday, 5 January 2013

How To Paint a Chaos Warhound Titan part 5. Painting begins.

Well, the warhound project is still in full steam, today I bring you the first update that involves a paint brush.  I've started painting at the bottom, with the legs. I find with big models this is the easiest way to make sure you get it all done. Whatever you do, don't start with either the guns or the head. Probably the best and most exciting parts to part, once you've done those, you start to lose drive to get the rest of it done.


So all the metal gets a rough base coat of 50/50 Tinbitz/Leadbletcher. The the workshop's credit, boltgun metal's replacement, mixes much better than boltgun ever used to.


All the decorative trim around the panels on the armour I just a gave a basecoat of Tinbitz.After this It all got a solid black wash, mixed from just acrylic black with water.


Once the wash had dried(I left it overnight), I grabbed a sponge and sponges tinbitz and boltgun mix lightly over the metal. I followed this with a pure almost 'Sponge drybrush' just to highlight and catch the edges of the metal.  


Once the metal had dried, I painted the armour panels with my favorite, now out of production and cost me to much on the Internet paint, charadon granite. This paint was brilliant, because although it appears pretty grey and warm, if you mix just a little bone colour with it, it starts to bring out a green tint. As far as I am aware, no other paint has this property.  


So after the basecoat was down, I mixed a little bleached bone with the charadon granite, and begun highlighting with my trusty sponge. I only gave the plates two highlights, as the details will come from multiple layers of washes and weathering at a later stage. 


Speaking of which, The legs got their first wash now, Gw's seraphim sepia. I used a standard brush to apply this in certain nooks and crannies on both the metals and the granite armour. In places I dragged it down, to give the impression of running oils and stains, as can be seen on his big toe here.


Once this has dried, I gave it a test with the torso. This shot shows him next to his big brother. Together they'll rule the galaxy I tell you. 


Thursday, 3 January 2013

How To Paint a Chaos Warhound titan, Part 4. Guns.

In and effort to keep my blog rolling in the start of the this new year, I'm back already with my 3rd post in a week. If you've been following, you'll knwo I've been working on a Forgeworld Chaos Warhound Titan, which will be painted in the same scheme as my Reaver from a year or so ago.

So last time, I had cleaned up, pinned and glued the main torso together, making the 3rd module to paint, following the base and the legs. Today I'm going to show you how I cleaned up the guns for the machine and how I turned the biggest flamer in the game traitor.


First thing to do with a Titan when it comes to its guns, is to choose 2. Forgeworld make both a plasma blastgun, and a vulcan megabolter in the chaos and Imperial varity, and also a turbolaser destructor and an inferno gun in Imperial. As you can see above, I choose a plasma blastgun, and an Inferno gun for this titan.  


'What, no strength 'D'?' I hear you cry? Well, no. The reason for this firstly is, Strength 'D'(I.e. turbolasers) are quite predictable. All to often on the Internet do you see titans with all turbolasers or the like. Now, I do own titans with turbo lasers, and I admit I'm in the rare position of being able to look at a titan and not see the need for them. I guess with this guy, I just wanted a change.


 The second reason for choosing an Inferno gun, is that is it the shortest ranged titan weapon you can get. If you've ever seen a titan in a game of apocalypse, you'll know 99% of the time, they stand in one spot, lording it over the battlefield, blazing away. But that's it. They don't need to move, as they can reach everything anyway. when you have ranges of 96''+ why move?

I want this one to have to run like the hunting hound it is. I want it to sprint over to the enemy line and torch them out of their trenches. Something about that just seems... Chaotic.  


 So, i started to traitorify the Inferno gun. I started chipping away with a 1mm drill bit in my dremel, just nicking the edges of plates, here and there, so it would match in with the rest of the machine. I drilled out a section on the cowling, and a couple of bigger chucks on the fuel tank to make it look the part too. I took some greenstuff and sculpted just a little bit of corrupted goo on there. Not to much because I can't sculpt that well, but just enough to know whats going on.


After this it was just a case of pinning the weapons and mountings on loosely, so I could play around with the posing. After all, the guns are it's arms, so they on important to how the over all machine will look.

With that, it's more or less ready to get some paint on. Hopefully, I can crack on with that before to long!

Til next time

Gonders

Tuesday, 1 January 2013

How To Paint a Chaos Warhound titan: Part 3

Its a new year folks. 2012 was a big one, I moved in with the other half, bought my own house, learnt how to plaster, spent time building wardrobes instead of ceramite, the list goes on. Unfortunately, due to this 'growing up' i seem to have done in 2012, my hobby time and blogging has suffered. I think part of my year's goals should be to try and increase my hobbying time backup to proper levels. So lets make a start with that already, merely a few hours in to the new year. Now we've woken up a bit and am shaking the hangover, I'll get some progress up here.
Last time I left you with this. The warhound has had it's base started. The legs are built and stuck, and the torso is pinned, weapons ready to get pinned next. Remember?   


Next up was to get the torso built properly. I spent a good afternoon cleaning up all the details, hatches, spines, vents, void shield generators, the lot and got gluing. The biggest parts I stuck with 2 part epoxy resin, the smaller details, just regular super glue.


As with a lot of forgeworld's stuff, there was quite the gap filling to be done. This shot shows about half way through that process. The spines I decided to put a brass rod 90% of the way through, as they were as flimsy as I thought. This is where working with resin beats plastic or metal, in that I was able to drill those pins all the way with a steady hand and my dremel. Should that have been plastic, it would have melted, or metal would have caused all sorts of snapped drill bits and mess.


Worth noting, I didn't glue in the central bulkhead, so I can still access the interior detail with my paintbrushes later on. Once the torso had entirely dried, I drilled a 2.6mm brass rod pin through the joint between torso and legs, in order the test the machine's balance... 

 
And happy days, we have one walking titan.


Next up, a bitch of a job. Those power cables that run between the head and the neck come in the straight lengths about 6'' long. Taking heat gun in hand, I begun the process of softening the resin the bend it into place. The job is a bitch, because its very hard to make the cables sit naturally. I takes quite the tweaking and playing around with hot resin.


There's two sides to be done, and as my titan is twisting it's head to the side, one cable had to look tight, and the other loose. The the tight one is one the right in this next picture.


And we're done. One growly happy warhound.


When I've built large models before, I find it wise to construct them in 'modules' to be painted. So with a titan, we have the legs, the torso, including the head, and the 2 arm weapons(more on these in the nest post).
We also have the base, which I've spent some more time on, cutting out the paving slabs once more. They'll get neatened up once the PVA glue have dried properly. I built the pile of rubble from a big blob of milliput, some of the resin offcuts from the titan itself, some good old sprue rubble, some basing sand, and finally, some 40k gubbins to make it look the part. Mix thoroughly and plaster on to the affected area.


I'm going to leave it there for the minute and go and crack on with the job at hand. Feel free to email or tweet questions or advice. 

Till next time

Gonders