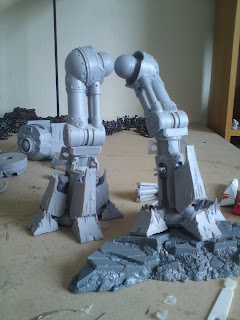
Well, I've finally made a decent start on the Reaver.
This kit is monstrous, and it certainly isn't for the faint hearted, or the inexperienced. These following pictures Are after a long morning's work on the legs. I've washed the whole kit and prepped it over the last 3 weeks, and yesterday I finally knuckled down to get some serious work done.
Posing it was the first step. I knew I wanted it walking over the Aquila from the honoured imperium set, it appeared big enough, and it seemed a fitting display of power for a mighty chaos titan to have cast down those who wronged them 10,000 years ago.
When I build my warhound a few years back, I learned when posing forgeworld titan, That trying the armour on the legs every step of the way is essential. When the legs are just bare bones, they appear to be very posable, until you fit all the armour and none of it fits anymore. The same appears to be true with a reaver's piston housing as well, so a got 2 hours was spent test fitting and dry running before I even touched it with glue.
Once I finally got the pose sorted, I pinned all the major joints with 2mm brass rod and a dremel, drilling a good 20mm in each where possible. I glued the biggest and most important joints with arreldite resin glue. This stuff has a longer working time than super glue, and sticks 20 times as well. Proper titan glue!
Next came fitting and gluing the piston housings, still test fitting the armour as i went. Just regular super-glue here, there's no weight on these joints. Also, I pinned the armour brackets into the housings at this point.
Next came toes and toe pistons. This is a pain in the arse job. The best way I figured to do it was to blu tac the pistons in the toes, and clip the pistons down bit by bit til you get the right length. Then super glue the end of each piston and push the toe up, leaving it to dry. Take the toe off so the pistons are left in the housings, take out the blu tac and glue the toe on.
Lastly, I pinned and glued the groin in place, just with 1mm paper clips and arreldite again. At the point I'd had enough for the day, so I left it there. Next up I'm going to cut out a base for it and detail the legs.
Just a scaling shot with my favourite toys at the minute so you can see just how big it is!
Til next time.
Gonders


No comments:
Post a Comment